
There are lof of developer now days started learning and devloping websites Angular 2, this is simple tutorial for those who are beginner and started learning & development with Angular 2. Tutorial is set of step one should follow to communicate with Restful Server service like Asp.net webApi to perfrom CRUD (Create, Read , Update & Delete) operation.
Tutorial is divided in two parts first part is creation of simple Asp.net WebApi i.e Restful server side service and second part is creation of Angular 2 application which consiste of just one page to consume webapi.
First part - Creation of Restful Service (webApi)
What is Asp.net WebApi? Asp.net Webapi is MVC based framework provided by Microsoft to create Resful web Api (i.e. restful web servie). one of advantage of web api is easy to create and cosnume. As its restul its compiable with HTTP protocol and HTTP verb. One should follow this link to learn more about it : Asp.net WebApi Before start creating webApi one must need to have Visual Studio installed on machine. Once one have visual studio follow the below steps
1. Create new solution and add new project in it. As shown in below image


4. Once project structure is ready, first task is to add Model Class. Model class is object which can be sent from server to client as response from controller or object received by contoller from client as part of request. To add model class just right click on Model foler and click add class.
Tutorial is divided in two parts first part is creation of simple Asp.net WebApi i.e Restful server side service and second part is creation of Angular 2 application which consiste of just one page to consume webapi.
First part - Creation of Restful Service (webApi)
What is Asp.net WebApi? Asp.net Webapi is MVC based framework provided by Microsoft to create Resful web Api (i.e. restful web servie). one of advantage of web api is easy to create and cosnume. As its restul its compiable with HTTP protocol and HTTP verb. One should follow this link to learn more about it : Asp.net WebApi Before start creating webApi one must need to have Visual Studio installed on machine. Once one have visual studio follow the below steps
1. Create new solution and add new project in it. As shown in below image
- Selecte language of development (here C# is chosen)
- Selecte Web unser language
- Selecte 'Asp.net Web Application' template
- Enter project name (here Employeemengementapi is project name)
- Click Ok.

2. On next window
- Select 'Empty' Template
- and Select 'WebApi' checkbox
- click Ok.

3. Once proper input is given during project creation, Visual studio create project structure as given in below image. Now one is ready to code Restful webApi.

4. Once project structure is ready, first task is to add Model Class. Model class is object which can be sent from server to client as response from controller or object received by contoller from client as part of request. To add model class just right click on Model foler and click add class.

5. Add enter name of model class as shown in below image and click add it will create plain class under model folder.

Below is simple Employee Class created as model, which is going to be used in the tutorial.
namespace EmployeeManagmentApi.Models
{
    public class Employee
    {

        public int ID { get; set; }

        [Required]
        public string firstname { get; set; }

        public string lastname { get; set; }
    }
}
6. Once project structure is ready, first task is to create Contoller. Contoller in MVC framework does heavy lifting job of hadling income client request and providing proper response to client. As given in below image one need to right click on solution folder and select add contoller.

7. Once add click , it display template for controller and as there is no fancy stuff involved (i.e. no entity framework related things) and as its WebApi for this tutorial 'Web API Contoller with read/wrtie actions' selected as given in below image.

8. Once clicked on Add in above screen it will display from where one should enter name of controller. once clicked it will create conroller with read/write action.

Below is code of contoller which is written for this tutorial. As part of tutorial just going to demostrate HttpGet request so only created one new method which is going to return Employee object.
one important thing to note here is [EnableCors(origins: "*", headers: "*", methods: "*")] line which is above controller , thats line is added to provide support for cross domain request (i.e. request which comes from other domain). More about cross domain request : CORS
namespace EmployeeManagmentApi.Controllers
{
    [EnableCors(origins: "*", headers: "*", methods: "*")]
    public class EmployeeController : ApiController
    {
        // GET: api/GetEmployees
        public IEnumerable<Employee> GetEmployees()
        {
            List<Employee> emplist = new List<Employee>
            {
                new Employee{ ID=1, firstname="Pranay", lastname="Rana"},
                new Employee{ ID=2, firstname="abc", lastname="xyz" }
            };

            return emplist;
        }

        // GET: api/Employee/5
        public string Get(int id)
        {
            return "value";
        }

        // POST: api/Employee
        public void Post([FromBody]string value)
        {
        }

        // PUT: api/Employee/5
        public void Put(int id, [FromBody]string value)
        {
        }

        // DELETE: api/Employee/5
        public void Delete(int id)
        {
        }
    }
}
9. once done with Controller and Model, one should modify the WebApiConfig.cs file which helps to configure webApi, such that it meets with the requirements like handling of Cross Domain request, Respose formate, Routes to serve request etc. Below is code for the same.
namespace EmployeeManagmentApi
{
    public static class WebApiConfig
    {
        public static void Register(HttpConfiguration config)
        {
            // Web API configuration and services
            config.Formatters.Remove(config.Formatters.XmlFormatter);

            // Cross domain reuest configuration
            config.EnableCors();

            // Web API routes
            config.MapHttpAttributeRoutes();

            config.Routes.MapHttpRoute(
               name: "NamedactionApi",
               routeTemplate: "api/{controller}/{action}/{id}",
               defaults: new { id = RouteParameter.Optional }
           );


            config.Routes.MapHttpRoute(
                name: "DefaultApi",
                routeTemplate: "api/{controller}/{id}",
                defaults: new { id = RouteParameter.Optional }
            );
        }
    }
}
Note : make sure you must install Microsoft.AspNet.WebApi.Cors package that is required for cross domain request handling code.
10. once done one can easily test web api just by typing url in browser as given in below image. It working as its get request but if want to test for other type request like Delete (HttpDelete), Update(HttpPut), Create (HttpPost), one should make use of Postman or fiddler.

Second part : Creation of Angular 2 App
Before starting with second part i.e. Angualr 2 App, one must needs to be ready with development environment. one must need to have following installed in machine
Once all the above installed (except BootStrap which requried to be install after project get created) , we are ready to go with first Angualr 2 appBefore starting with second part i.e. Angualr 2 App, one must needs to be ready with development environment. one must need to have following installed in machine
- Visual Studio Code
Visual Studio code is development tool provided by Microsoft. Some of the majaor advatnages of it is it's free and not heavy tool as Visual Studio, lot of plugin/ etension avaiable which helps in development. - Node.Js &npm :
It's required to manage and install libaray / packages. It's runtime which convert typescript code in javascript code which broswer understand and run application in browser. - Angular Cli
It's helpful commandline utility which helps from project start (setup new application) till end (deployment of project). Some of the advantages are easy project creation, allows to create module, component, service, model class, pipe etc. (i.e used for scofolding) just help of commands, setup lint which helpful in code formatting during development, webpack - which help in bundling typescript/javascript/css files and create chunk of code,testing, minifying, . - Version Control Tool (ex. GitHub)
It's helpful for keeping code which at location, from which you can retive code and keep version of code so allow to compare between diffrent version of code. - BootStrap
This is not must needed pacakge, but it's helful if you don't want to spend much time in styling your application. It's css libarary comes up with ready made Styles (CSS) and some simple jQuery stuff. I makes development faster.
1. Create application by running angular cli command 'ng new [projectname]', as given below

This command will create folder with all necessary things required for angular 2 app and it's also install necessary packages which is listed in package.json file.
Note: command ran with --routing argument, it will create routing module with new application , its needed as sooner or later you need more number of pages in your application and want to navigate betwen that pages.
2. Now open Visual Studio Code on your machine and click on open folder, then navigate to the path where folder got created and click 'Select Folder'.

3. Visual Studio code shows folder structure as below in visual studio code.

Important file in folder strucutre are
- Package.json - File which contains all packages that installed for the project i.e. file used for managing packages in project.
- tsconfig.json - File cotains setting related to typescript compiler , i.e. setting to compile typscript .
-
src - folder going to contains all the code (module, component, pipe, service etc.) for creating application.
src> Application -When new application get created it got created with default Application Module and Application Component. - src > asset - folder conatins style, images used in project.
- node_module - folder conatins all installed packages. which lis listed in package.json.
- src > environment - contains files which is having setting realted to current running environment. i.e. contains settings file for dev, prod and test evnvironment related settings file.
- e2e - stand for end to end testing.
- src > polyfill.js - file contains code to render application on all broswer.
- tslint.json - File contains all setting related to linting code i.e. formatting code properly duing development.
- angular-cli.json - file contains setting related to angular cli utility, this setting used by angular cli utility.
- index.html - page get loaded in when user brows and its page which load angular application.
- main.ts - file contains application bootstaping realted code. It conatins reference to module which first needs to be get loaded when application start. In newly created application it contains reference to 'ApplicationModule'.
4. After opening application, start integarter terminal in visual studio, by clickin on View > integrated terminal. This will open up command line in visual studio.
run command 'npm install' if pacakage installation not done during proect creation. after that first run 'ng serve' command it will run application and to check it worked correctly. Go to url : http://localhost:4200 it will open up defaultly created application.
Now, remove all unecessary stuff i.e. html from index.html file.
5. Run command npm install bootstrap and install bootstrap in project. After intallation done to make use of bootstrap in project, there is need of modifying angular.cli.json file as below. run command 'npm install' if pacakage installation not done during proect creation. after that first run 'ng serve' command it will run application and to check it worked correctly. Go to url : http://localhost:4200 it will open up defaultly created application.
Now, remove all unecessary stuff i.e. html from index.html file.
      "styles": [
        "styles.css",
        "../node_modules/bootstrap/dist/css/bootstrap.css"
      ],
      "scripts": [
        "../node_modules/bootstrap/dist/js/bootstrap.js"
      ],
Go to Angualr cli.json locate styles and scripts array and add path of .css and .js file of bootstrap.
6. Now run following command in integrated terminal i.e. command line same given in below image.
- ng g module feature/employees --routing
This command create new mdoule called employess with routing feature. - ng g component feature/employees
command create feature called employees in employee module.

Note: Please follow : style guide for recomended angular application structure.
As per guide application should have follwing folder under src folder
- Application - this folder is already there when you create new project, its folder which contains application module.
- Feature - this folder conatins all the feature going to be part of applicatio. for eample in Employeemangment application its will going to have feature like Employees (componet for employee add,delete,update & read), Department (componet for employee add,delete,update & read)etc.
- Core - this folder going to contains application core, it contains all the singleton services that is going to be used by features modules , it will contains service like application wide exception service, application wide user profile service, nav bar etc.
- Shared - this folder going to contains all the comman services , pipe, component, directives which is going to be used by features modules.
Once command run it will create feature called Employees in project. One
of the adavantage of creating module/component with angular it will do
all necessary modification in project like adding routing, adding newly
created component to module, so it saves effort of going to each file
add adding this details. It also create module,compoent,servie,pipe,
directive with proper etension like xyz.mdoule.ts. xyz.component.ts etc. as per style guide to identify given file is for compoenet or module or service etc.
7. Next step is to add model in feature its interface going to have structure similar response structure which comes after making http call from service. It's kind of plain property class.
command : ng g interface feature/employees/model creates model interface model.
7. Next step is to add model in feature its interface going to have structure similar response structure which comes after making http call from service. It's kind of plain property class.
command : ng g interface feature/employees/model creates model interface model.

Modify model.ts as below
8. Once module, component get created. Make use of below command it will add service i.e. data service which is going to be used by Employee module. DataService mostly going to have code which communicate with serverside api.
command : ng g service feature/employees/employees -m=feature/employees/employees.module create dataservice called employee and also add service as provider list in module defination file as given in below image.

Modify employees.service.ts as below
Some of change to note here is
9. Once done with above changes do modify , componet files as below
employees.component.ts
typescript code in this inject employeeservice. Make call to employeeservice > getemployees method form ngInit to get employees from server and it stores response coming out from servers in observalbe of employee array.
employees.component.html
html code make use of async pipe of angular framework to subscribe obersable employees created in typescript file and get actual employee array. Code also make use of *ngFor angular framewrok directive to go through all the employess in received array and create table row.
10. Afer all change done run command 'ng lint' to find out if there is any lint error i.e. code formatting error.
11. Below screen shot shows final output of the tutorial.

export interface Employee {
    ID?: number;
    firstname?: string;
    lastname?: string;
}
8. Once module, component get created. Make use of below command it will add service i.e. data service which is going to be used by Employee module. DataService mostly going to have code which communicate with serverside api.
command : ng g service feature/employees/employees -m=feature/employees/employees.module create dataservice called employee and also add service as provider list in module defination file as given in below image.

Modify employees.service.ts as below
import { Injectable } from '@angular/core';
import { HttpClient, HttpHeaders } from '@angular/common/http';
import { Observable } from 'rxjs/Observable';

import { Employee } from './model';

@Injectable()
export class EmployeesService {

  apiUrl = 'http://localhost:1800/api/demo/';
  constructor(
    private http: HttpClient
  ) { }

  getEmployees(): Observable<Employee[]> {
    const url = `${this.apiUrl}getemployees`;
    return this.http.get <Employee[]>(url);
  }
}
Some of change to note here is
- HttpClient - injected in employee service. it's service provided as part of Angular 2 framework for communicating with serverside service. In this tutorial its going to comuunicate with EmployeeManagementApi webapi created in first part.
- getEmployees - method of service which make use of http service and calls getEmployees method of web api to get all employees.
9. Once done with above changes do modify , componet files as below
employees.component.ts
import { Component, OnInit } from '@angular/core';
import { EmployeesService } from './employees.service';
import { Observable } from 'rxjs/Observable';
import { Employee } from './model';

@Component({
  selector: 'app-employees',
  templateUrl: './employees.component.html',
  styleUrls: ['./employees.component.css']
})
export class EmployeesComponent implements OnInit {

  employees: Observable<Employee[]>;
  constructor(
    private employeesService: EmployeesService
  ) { }

  ngOnInit() {
    this.employees = this.employeesService.getEmployees();
  }
}
typescript code in this inject employeeservice. Make call to employeeservice > getemployees method form ngInit to get employees from server and it stores response coming out from servers in observalbe of employee array.
employees.component.html
 <div class="container">
  <h2>Employees</h2>

  <table class="table table-striped">
    <thead>
      <tr>
        <th>Id</th>
        <th>Firstname</th>
        <th>Lastname</th>
      </tr>
    </thead>
    <tbody *ngIf='employees'>
      <tr *ngFor="let employee of employees | async">
          <td>{{employee.ID}}</td>
          <td>{{employee.firstname}}</td>
          <td>{{employee.lastname}}</td>
      </tr>
    </tbody>
  </table>
</div>
html code make use of async pipe of angular framework to subscribe obersable employees created in typescript file and get actual employee array. Code also make use of *ngFor angular framewrok directive to go through all the employess in received array and create table row.
10. Afer all change done run command 'ng lint' to find out if there is any lint error i.e. code formatting error.
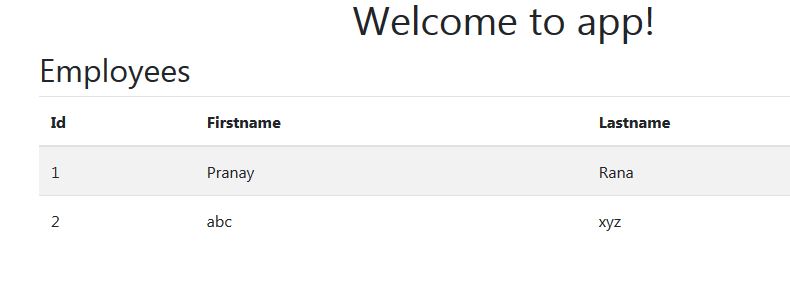
11. Below screen shot shows final output of the tutorial.
Conclusion
Tutorial covers most of the basic which one needs to start with angula 2 application (except testing of application). One should find full code of tutorial here : WebApi - EmployeeManagementApi AngularApp - EmployeeManagment
Great tutorial for beginners
ReplyDeletecan we develop Angular2 Web Api with out Visual studio Code Editor?
ReplyDelete